1. Grid System
Basic App
First of all, make sure you got the latest version of CustomTkinter installed. Then you can test your installation with the most basic program, which only creates a window:
import customtkinter

app = customtkinter.CTk()
app.mainloop()
If this is working, you can start setting properties of the window like title and geometry, and start adding a button to the window.
The first parameter to any widget is always the master parameter, which is appin this case. It can also be given with a keyword argument (master=app).
import customtkinter
def button_callback():
print("button pressed")
app = customtkinter.CTk()
app.title("my app")
app.geometry("400x150")
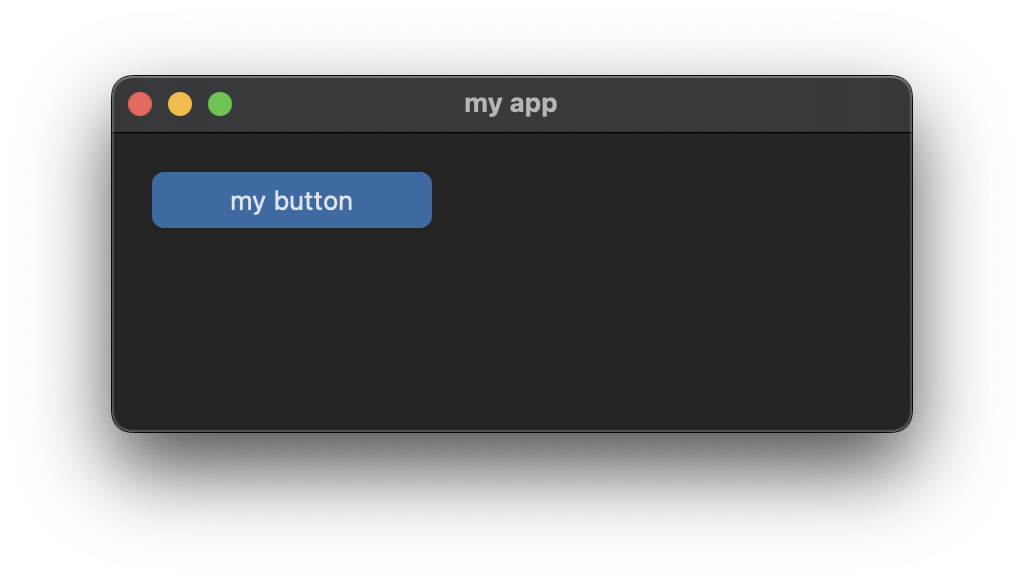
button = customtkinter.CTkButton(app, text="my button", command=button_callback)
button.grid(row=0, column=0, padx=20, pady=20)
app.mainloop()
Grid geometry manager
In this example the grid geometry manager is used to set the position and padding of the widget. It is highly recommended to always use the gridgeometry manager instead of place and pack, because it is very easy to create responsive and extendable user interfaces.
The grid splits a window or frame into columns and rows, which collapse when they are empty, but adapt to the size of the widgets placed inside them. If you want to center the button in the last example, you would have to give the first column a weight other than zero, so that it does not collapse to the size of the button anymore (use grid_rowconfigure() for rows):
app.grid_columnconfigure(0, weight=1)
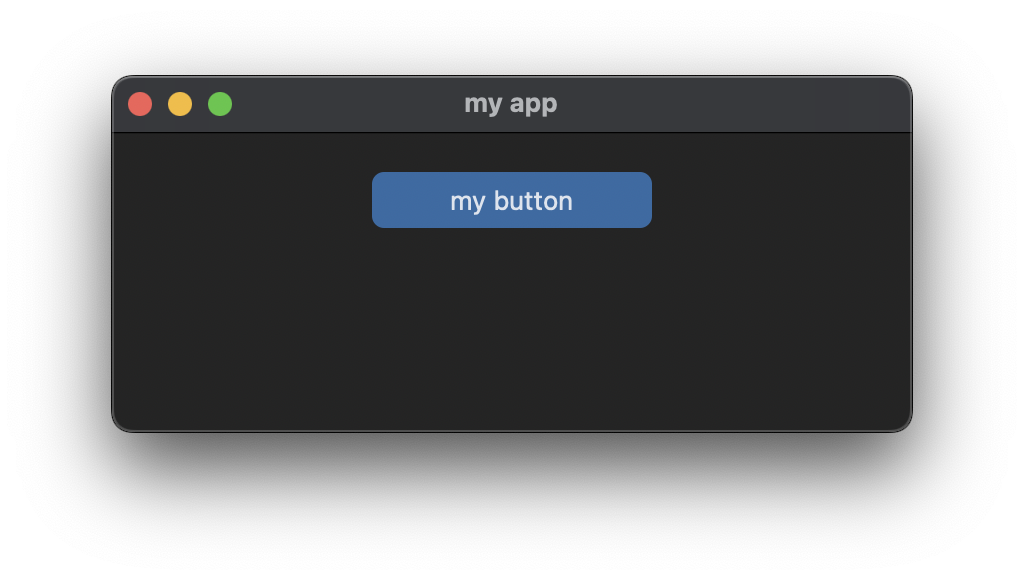
Now column 0 spans the whole window because it has a weight of 1 and therefore expands. You can also configure the button to expand with it's grid cell if you add a sticky argument to the grid call like this:
button.grid(row=0, column=0, padx=20, pady=20, sticky="ew")
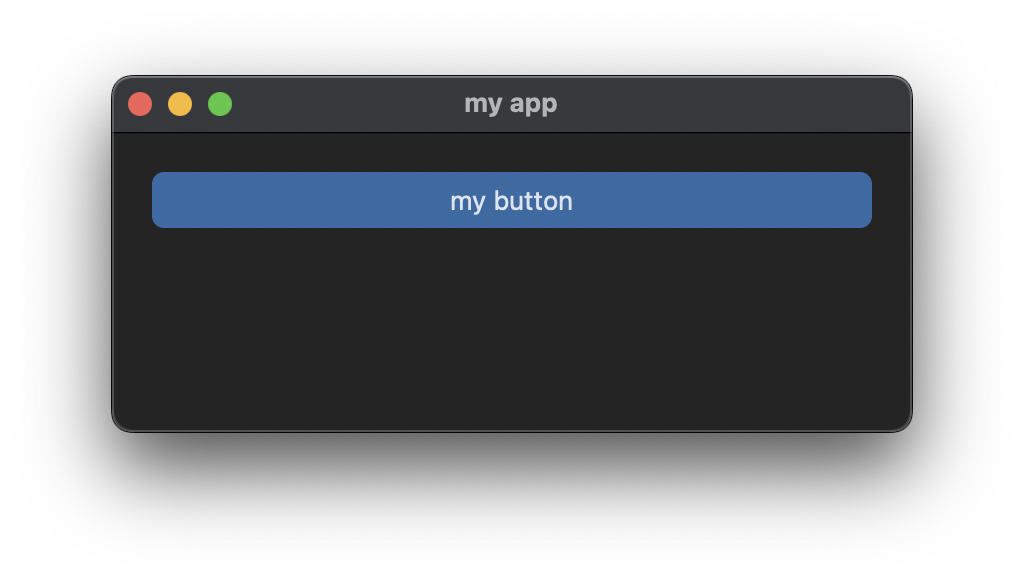
Now the button sticks to the grid cell on the east and west side. You can notice that grid cell and therefore the button size adapts if you resize the window.
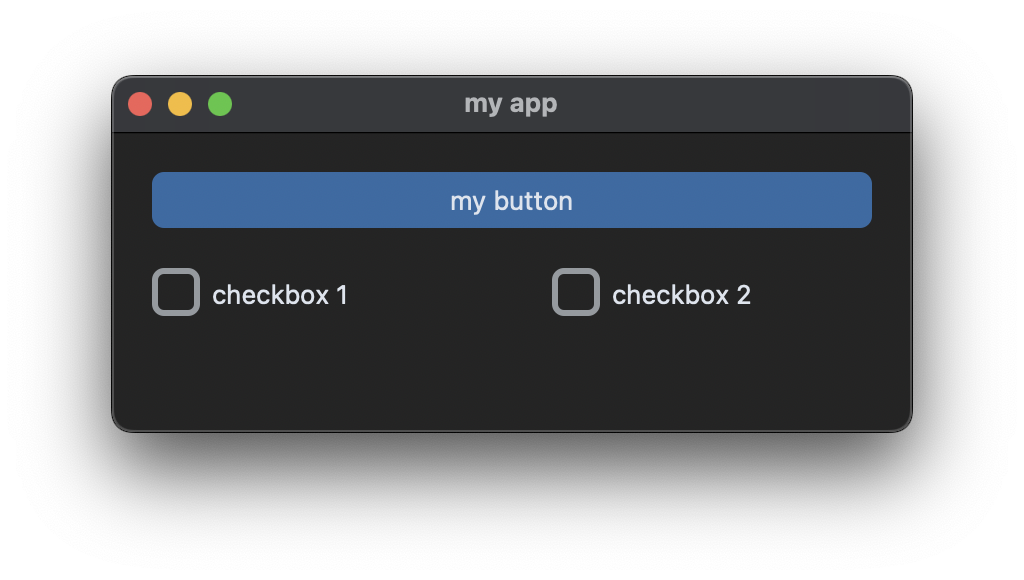
Add checkboxes
To get make the layout a bit more complex, we add two checkboxes in the second row.
checkbox_1 = customtkinter.CTkCheckBox(app, text="checkbox 1")
checkbox_1.grid(row=1, column=0, padx=20, pady=(0, 20), sticky="w")
checkbox_2 = customtkinter.CTkCheckBox(app, text="checkbox 2")
checkbox_2.grid(row=1, column=1, padx=20, pady=(0, 20), sticky="w")
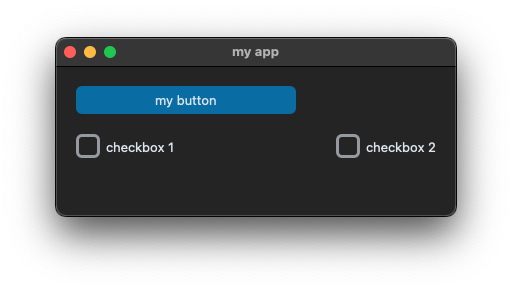
Note that the pady argument gets a tuple, which means 0 padding on the top and 20 padding on the bottom. Also note that the checkboxes are only sticky to the west side of their grid cell.
To let the button span the whole window again, we need to set a columnspan of 2 for it (use rowspan for rows).
button.grid(row=0, column=0, padx=20, pady=20, sticky="ew", columnspan=2)
And to equally space the checkboxes we also need to give both columns an equal weight.
app.grid_columnconfigure((0, 1), weight=1)
The the complete program looks like this now:
def button_callback():
    print("button pressed")

app = customtkinter.CTk()
app.title("my app")
app.geometry("400x150")
app.grid_columnconfigure((0), weight=1)

button = customtkinter.CTkButton(app, text="my button", command=button_callback)
button.grid(row=0, column=0, padx=20, pady=20, sticky="ew", columnspan=2)
checkbox_1 = customtkinter.CTkCheckBox(app, text="checkbox 1")
checkbox_1.grid(row=1, column=0, padx=20, pady=(0, 20), sticky="w")
checkbox_2 = customtkinter.CTkCheckBox(app, text="checkbox 2")
checkbox_2.grid(row=1, column=1, padx=20, pady=(0, 20), sticky="w")

app.mainloop()
Using classes
To complete this introduction, we want to structure this program into a class. It is highly recommended to use classes which inherit from CTk for the main window or CTkFrame for a frame, because it highly increases the readability of the code and the code becomes easily extendable, because classes can be easily distributed to multiple files.
Except for small programs or tests, always create separate classes for CTk, CTkToplevel or CTkFrame. Writing a lot of UI code in a single file without using classes is a pain to read and very bad coding style.
class App(customtkinter.CTk):
    def __init__(self):
        super().__init__()

        self.title("my app")
        self.geometry("400x150")
        self.grid_columnconfigure((0, 1), weight=1)

        self.button = customtkinter.CTkButton(self, text="my button", command=self.button_callback)
        self.button.grid(row=0, column=0, padx=20, pady=20, sticky="ew", columnspan=2)
        self.checkbox_1 = customtkinter.CTkCheckBox(self, text="checkbox 1")
        self.checkbox_1.grid(row=1, column=0, padx=20, pady=(0, 20), sticky="w")
        self.checkbox_2 = customtkinter.CTkCheckBox(self, text="checkbox 2")
        self.checkbox_2.grid(row=1, column=1, padx=20, pady=(0, 20), sticky="w")

    def button_callback(self):
        print("button pressed")

app = App()
app.mainloop()