2. Using Frames
Creating a frame
We start with a similar example than in the intro, a window with a button and some checkboxes:
class App(customtkinter.CTk):
    def __init__(self):
        super().__init__()

        self.title("my app")
        self.geometry("400x180")
        self.grid_columnconfigure(0, weight=1)
        self.grid_rowconfigure((0, 1), weight=1)

        self.checkbox_1 = customtkinter.CTkCheckBox(self, text="checkbox 1")
        self.checkbox_1.grid(row=0, column=0, padx=10, pady=(10, 0), sticky="w")
        self.checkbox_2 = customtkinter.CTkCheckBox(self, text="checkbox 2")
        self.checkbox_2.grid(row=1, column=0, padx=10, pady=(10, 0), sticky="w")
        self.button = customtkinter.CTkButton(self, text="my button", command=self.button_callback)
        self.button.grid(row=3, column=0, padx=10, pady=10, sticky="ew")

    def button_callback(self):
        print("button pressed")

app = App()
app.mainloop()
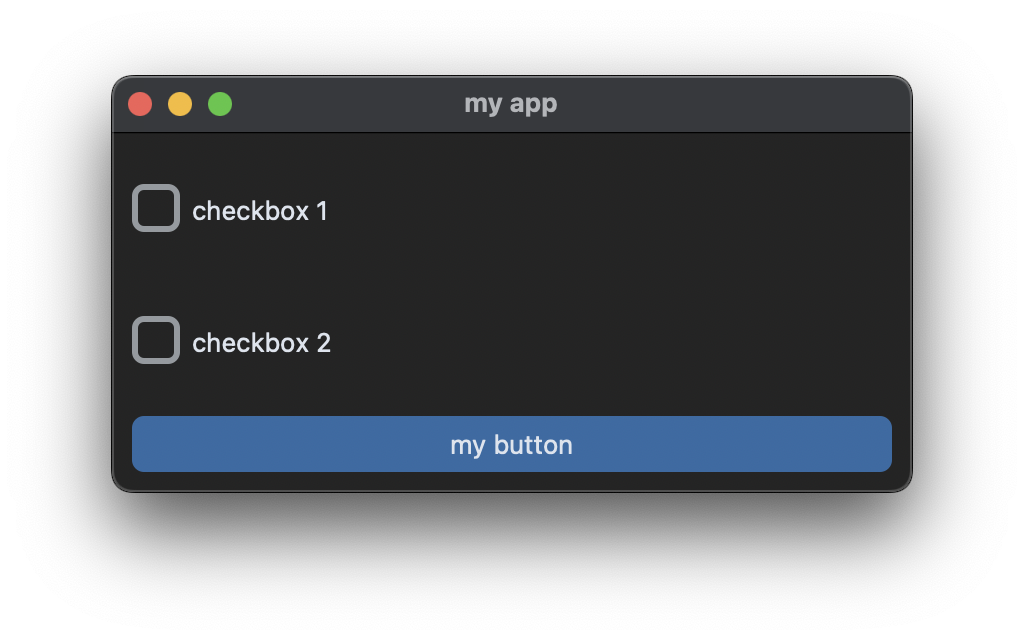
If we now want to add another checkbox in row 2, we would also have to change the row number of the button. So a change like this requires changes on the layout below the checkbox. To prevent such side effects, keep changes contained and structure the layout visually, we are using frames.
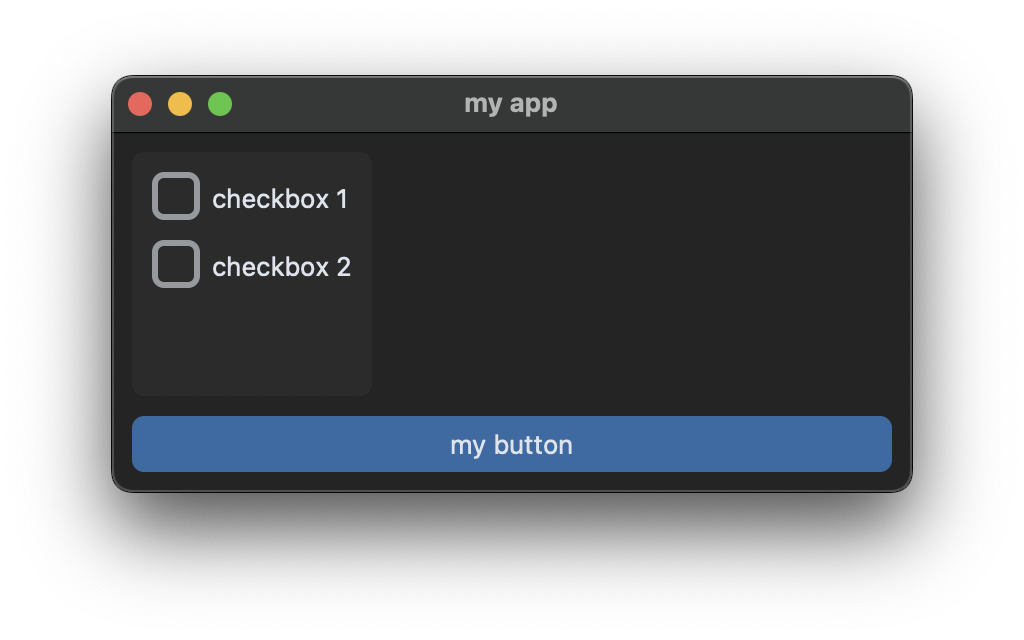
We place the frame in to row 0, the button in row 1, and configure row 0 and column 0 to expand. The frame gets a sticky parameter of 'nsw' so it expands with its cell to the north, south and west. The checkboxes now get the frame as the master argument instead of self.
class App(customtkinter.CTk):
    def __init__(self):
        super().__init__()

        self.title("my app")
        self.geometry("400x180")
        self.grid_columnconfigure(0, weight=1)
        self.grid_rowconfigure(0, weight=1)

        self.checkbox_frame = customtkinter.CTkFrame(self)
        self.checkbox_frame.grid(row=0, column=0, padx=10, pady=(10, 0), sticky="nsw")
        self.checkbox_1 = customtkinter.CTkCheckBox(self.checkbox_frame, text="checkbox 1")
        self.checkbox_1.grid(row=0, column=0, padx=10, pady=(10, 0), sticky="w")
        self.checkbox_2 = customtkinter.CTkCheckBox(self.checkbox_frame, text="checkbox 2")
        self.checkbox_2.grid(row=1, column=0, padx=10, pady=(10, 0), sticky="w")

        self.button = customtkinter.CTkButton(self, text="my button", command=self.button_callback)
        self.button.grid(row=3, column=0, padx=10, pady=10, sticky="ew")

    def button_callback(self):
        print("button pressed")
Using classes
And to reflect the layout in the code and follow the priniciple of always using classes from the intro, we will move the frame and checkbox code into a separate class. This class inherits from CTkFrame and an instance of this class gets created in the main App class.
Only the master argument needs to get passed into the __init__ method of the new MyCheckboxFrame and so that it can then get passed to the __init__ of the super class which is the CTkFrame.
class MyCheckboxFrame(customtkinter.CTkFrame):
    def __init__(self, master):
        super().__init__(master)

        self.checkbox_1 = customtkinter.CTkCheckBox(self, text="checkbox 1")
        self.checkbox_1.grid(row=0, column=0, padx=10, pady=(10, 0), sticky="w")
        self.checkbox_2 = customtkinter.CTkCheckBox(self, text="checkbox 2")
        self.checkbox_2.grid(row=1, column=0, padx=10, pady=(10, 0), sticky="w")

class App(customtkinter.CTk):
    def __init__(self):
        super().__init__()

        self.title("my app")
        self.geometry("400x180")
        self.grid_columnconfigure(0, weight=1)
        self.grid_rowconfigure(0, weight=1)

        self.checkbox_frame = MyCheckboxFrame(self)
        self.checkbox_frame.grid(row=0, column=0, padx=10, pady=(10, 0), sticky="nsw")

        self.button = customtkinter.CTkButton(self, text="my button", command=self.button_callback)
        self.button.grid(row=3, column=0, padx=10, pady=10, sticky="ew")

    def button_callback(self):
        print("button pressed")

app = App()
app.mainloop()
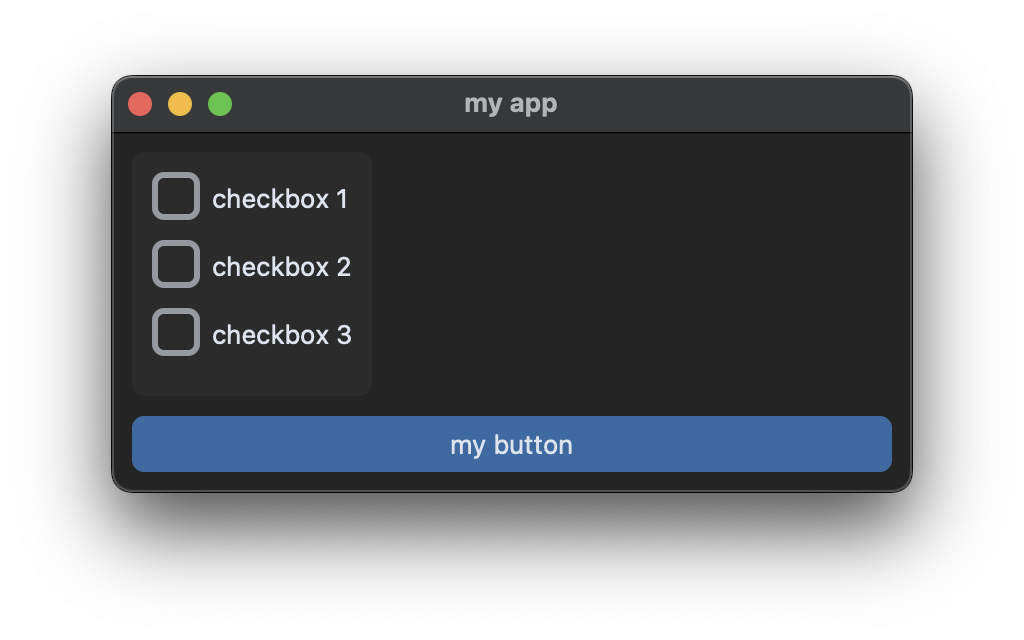
Now we can simply add another checkbox in the MyCheckboxFrame class without affecting the layout of the button:
class MyCheckboxFrame(customtkinter.CTkFrame):
    def __init__(self, master):
        super().__init__(master)

        self.checkbox_1 = customtkinter.CTkCheckBox(self, text="checkbox 1")
        self.checkbox_1.grid(row=0, column=0, padx=10, pady=(10, 0), sticky="w")
        self.checkbox_2 = customtkinter.CTkCheckBox(self, text="checkbox 2")
        self.checkbox_2.grid(row=1, column=0, padx=10, pady=(10, 0), sticky="w")
        self.checkbox_3 = customtkinter.CTkCheckBox(self, text="checkbox 3")
        self.checkbox_3.grid(row=2, column=0, padx=10, pady=(10, 0), sticky="w")
Extend frame class
Of course we need a way to read the values of the checkboxes from the main App class. Therefore we will implement a get method for the MyCheckboxFrame class, which will return a list of strings with the text attributes of the checked checkboxes:
class MyCheckboxFrame(customtkinter.CTkFrame):
    def __init__(self, master):
        super().__init__(master)

        self.checkbox_1 = customtkinter.CTkCheckBox(self, text="checkbox 1")
        self.checkbox_1.grid(row=0, column=0, padx=10, pady=(10, 0), sticky="w")
        self.checkbox_2 = customtkinter.CTkCheckBox(self, text="checkbox 2")
        self.checkbox_2.grid(row=1, column=0, padx=10, pady=(10, 0), sticky="w")
        self.checkbox_3 = customtkinter.CTkCheckBox(self, text="checkbox 3")
        self.checkbox_3.grid(row=2, column=0, padx=10, pady=(10, 0), sticky="w")

    def get(self):
        checked_checkboxes = []
        if self.checkbox_1.get() == 1:
            checked_checkboxes.append(self.checkbox_1.cget("text"))
        if self.checkbox_2.get() == 1:
            checked_checkboxes.append(self.checkbox_2.cget("text"))
        if self.checkbox_3.get() == 1:
            checked_checkboxes.append(self.checkbox_3.cget("text"))
        return checked_checkboxes
We can use this method in the button_callback method of the App class:
    def button_callback(self):
        print("checked checkboxes:", self.checkbox_frame.get())
Now if you press the button, the currently checked checkboxes will be printed:
checked checkboxes: ['checkbox 1', 'checkbox 3']
Dynamic frame class
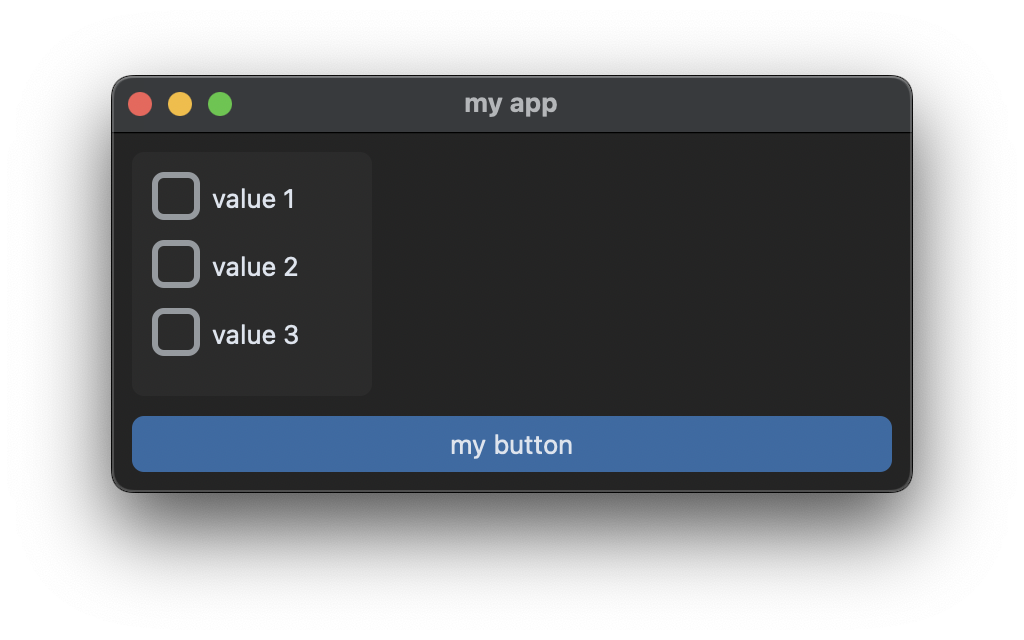
But the values of the checkboxes in the MyCheckboxFrame are hardcoded in the code right now. To make the MyCheckboxFrame class more dynamically usable, we pass a list of string values to the MyCheckboxFrame, which will be the text values of the checkboxes in the frame. Now the number of checkboxes is also arbitrary.
class MyCheckboxFrame(customtkinter.CTkFrame):
    def __init__(self, master, values):
        super().__init__(master)
        self.values = values
        self.checkboxes = []

        for i, value in enumerate(self.values):
            checkbox = customtkinter.CTkCheckBox(self, text=value)
            checkbox.grid(row=i, column=0, padx=10, pady=(10, 0), sticky="w")
            self.checkboxes.append(checkbox)

    def get(self):
        checked_checkboxes = []
        for checkbox in self.checkboxes:
            if checkbox.get() == 1:
                checked_checkboxes.append(checkbox.cget("text"))
        return checked_checkboxes
The checkboxes get created in a for loop and saved in a list called checkboxes. In the get method we can loop through this list to check which checkbox is checked and return the appropriate text values. In the App class, where we create an instance of the MyCheckboxFrame, we need to pass a list of values now:
self.checkbox_frame = MyCheckboxFrame(self, values=["value 1", "value 2", "value 3"])
self.checkbox_frame.grid(row=0, column=0, padx=10, pady=(10, 0), sticky="nsw")
Multiple instances
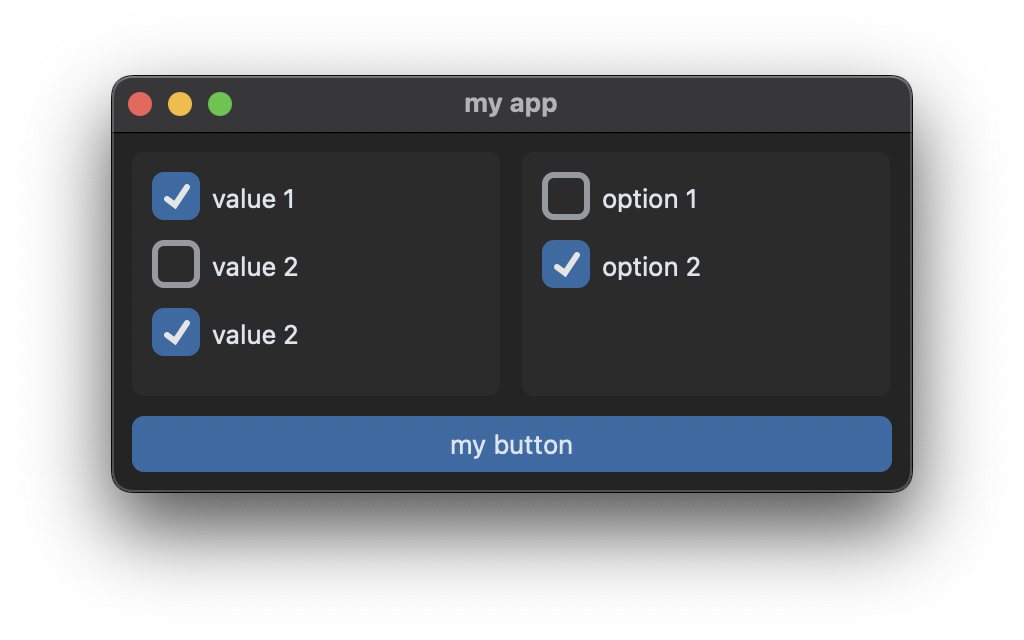
But now that we can dynamically control the values of checkboxes, we can very easily create two or more instances of the MyCheckboxFrame class. We have to give the button a columnspan of 2 and add a weight of 1 to column 1.
class App(customtkinter.CTk):
    def __init__(self):
        super().__init__()

        self.title("my app")
        self.geometry("400x180")
        self.grid_columnconfigure((0, 1), weight=1)
        self.grid_rowconfigure(0, weight=1)

        self.checkbox_frame_1 = MyCheckboxFrame(self, values=["value 1", "value 2", "value 3"])
        self.checkbox_frame_1.grid(row=0, column=0, padx=10, pady=(10, 0), sticky="nsew")
        self.checkbox_frame_2 = MyCheckboxFrame(self, values=["option 1", "option 2"])
        self.checkbox_frame_2.grid(row=0, column=1, padx=(0, 10), pady=(10, 0), sticky="nsew")

        self.button = customtkinter.CTkButton(self, text="my button", command=self.button_callback)
        self.button.grid(row=3, column=0, padx=10, pady=10, sticky="ew", columnspan=2)

    def button_callback(self):
        print("checkbox_frame_1:", self.checkbox_frame_1.get())
        print("checkbox_frame_2:", self.checkbox_frame_2.get())
Output when the button gets pressed:
checkbox_frame_1: ['value 1', 'value 3']
checkbox_frame_2: ['option 2']
Add title to frame
We can further enhance the MyCheckboxFrame class by adding label, which acts as a title for the frame.
class MyCheckboxFrame(customtkinter.CTkFrame):
    def __init__(self, master, title, values):
        super().__init__(master)
        self.grid_columnconfigure(0, weight=1)
        self.values = values
        self.title = title
        self.checkboxes = []

        self.title = customtkinter.CTkLabel(self, text=self.title, fg_color="gray30", corner_radius=6)
        self.title.grid(row=0, column=0, padx=10, pady=(10, 0), sticky="ew")

        for i, value in enumerate(self.values):
            checkbox = customtkinter.CTkCheckBox(self, text=value)
            checkbox.grid(row=i+1, column=0, padx=10, pady=(10, 0), sticky="w")
            self.checkboxes.append(checkbox)

    def get(self):
        checked_checkboxes = []
        for checkbox in self.checkboxes:
            if checkbox.get() == 1:
                checked_checkboxes.append(checkbox.cget("text"))
        return checked_checkboxes
Note that column 0 inside of the frame is now configure to have a weight of 1, so that the label spans the whole frame with its sticky value of 'ew'. For the CTkLabel we passed an fg_color and corner_radius argument because the label is 'transparent' by default and has a corner_radius of 0. ALso note that the grid row position is now i+1 because of the title label in the first row.
Now we need to pass values for the title parameter of the MyCheckboxFrame when we create instances of it in the App class:
self.checkbox_frame_1 = MyCheckboxFrame(self, "Values", values=["value 1", "value 2", "value 3"])
self.checkbox_frame_2 = MyCheckboxFrame(self, "Options", values=["option 1", "option 2"])
If we also increase the height of the window to 220px we get:
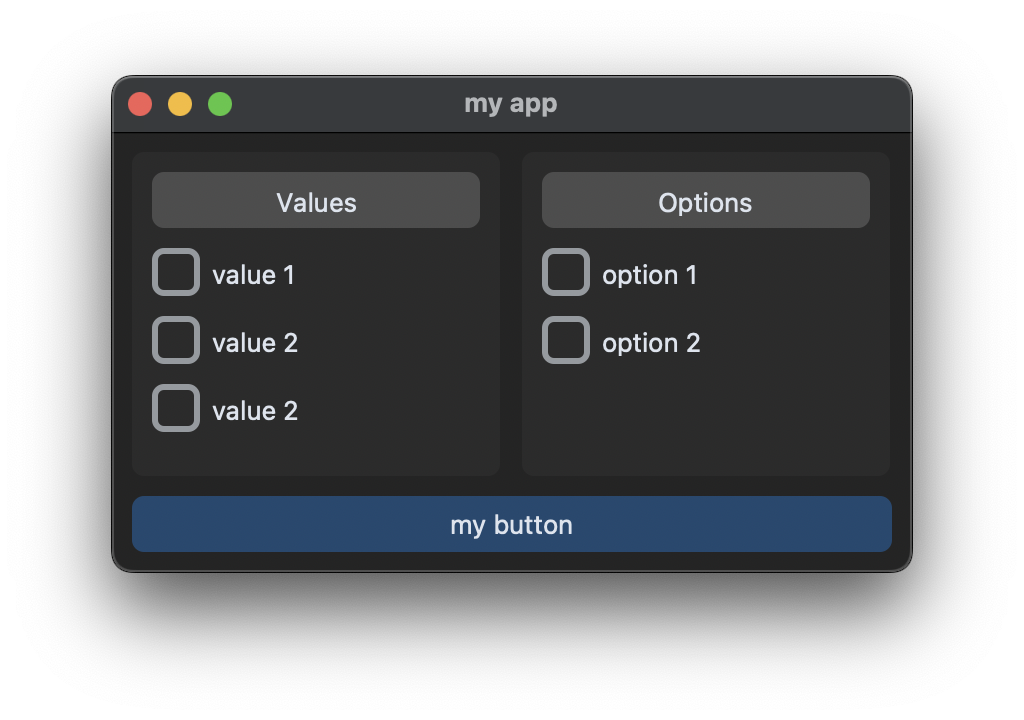
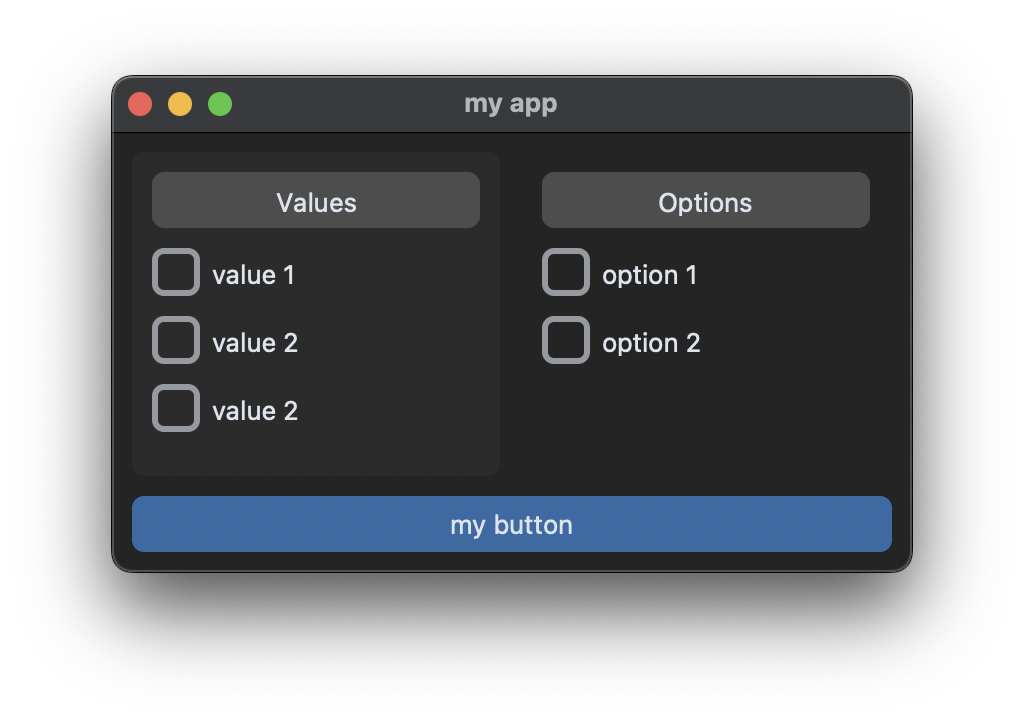
Now we have titles for the checkbox frames. And because MyCheckboxFrame inherits from CTkFrame, it can be configured like a CTkFrame, for example with a transparent fg_color:
self.checkbox_frame_2.configure(fg_color="transparent")
Radiobutton frame
Similar to the MyCheckboxFrame we can create a MyRadiobuttonFrame which consists of radiobuttons instead of checkboxes.
class MyRadiobuttonFrame(customtkinter.CTkFrame):
    def __init__(self, master, title, values):
        super().__init__(master)
        self.grid_columnconfigure(0, weight=1)
        self.values = values
        self.title = title
        self.radiobuttons = []
        self.variable = customtkinter.StringVar(value="")

        self.title = customtkinter.CTkLabel(self, text=self.title, fg_color="gray30", corner_radius=6)
        self.title.grid(row=0, column=0, padx=10, pady=(10, 0), sticky="ew")

        for i, value in enumerate(self.values):
            radiobutton = customtkinter.CTkRadioButton(self, text=value, value=value, variable=self.variable)
            radiobutton.grid(row=i + 1, column=0, padx=10, pady=(10, 0), sticky="w")
            self.radiobuttons.append(radiobutton)

    def get(self):
        return self.variable.get()

    def set(self, value):
        self.variable.set(value)
And in the App we create an instance of MyRadiobuttonFrame similar to MyCheckboxFrame:
class App(customtkinter.CTk):
    def __init__(self):
        super().__init__()

        self.title("my app")
        self.geometry("400x220")
        self.grid_columnconfigure((0, 1), weight=1)
        self.grid_rowconfigure(0, weight=1)

        self.checkbox_frame = MyCheckboxFrame(self, "Values", values=["value 1", "value 2", "value 3"])
        self.checkbox_frame.grid(row=0, column=0, padx=10, pady=(10, 0), sticky="nsew")
        self.radiobutton_frame = MyRadiobuttonFrame(self, "Options", values=["option 1", "option 2"])
        self.radiobutton_frame.grid(row=0, column=1, padx=(0, 10), pady=(10, 0), sticky="nsew")

        self.button = customtkinter.CTkButton(self, text="my button", command=self.button_callback)
        self.button.grid(row=3, column=0, padx=10, pady=10, sticky="ew", columnspan=2)

    def button_callback(self):
        print("checkbox_frame:", self.checkbox_frame.get())
        print("radiobutton_frame:", self.radiobutton_frame.get())
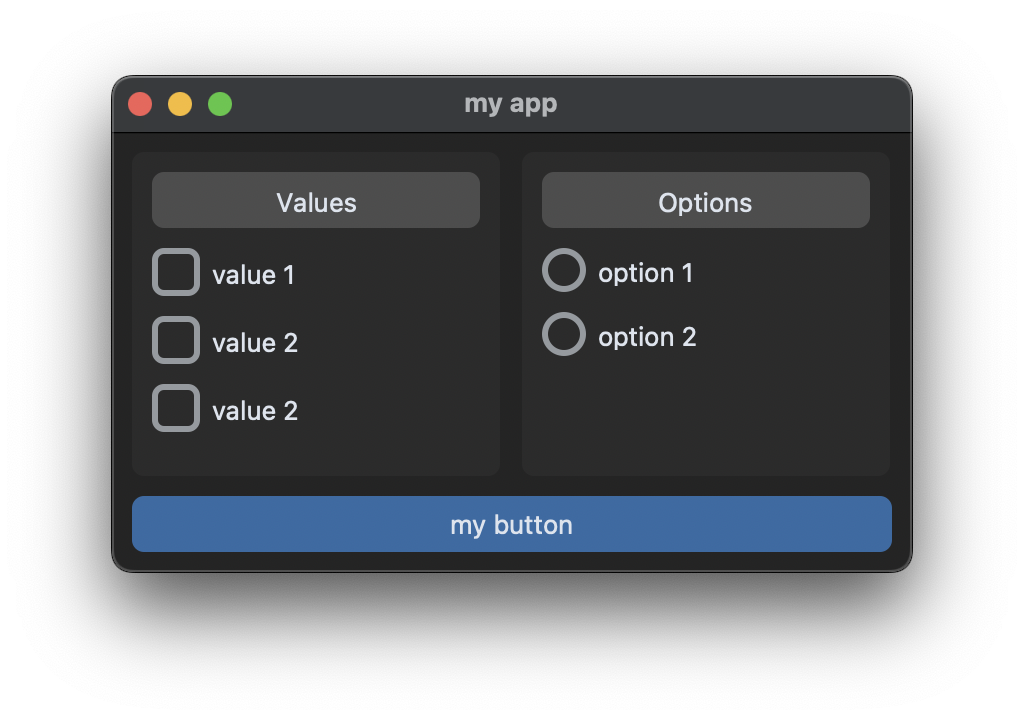
Now we have two different dynamically created frames, that can be used to get input from the user.